Benchy - .net performance benchmarking
So what is it?
Benchy is an open source .net tool for benchmarking the execution speed of sections of code after each build. Benchmarks are graphed so that changes to performance characteristics in builds can be easily visualised.
Source Code
https://github.com/kezakez/Benchy
NuGet package
http://nuget.org/List/Packages/Benchy
Why?
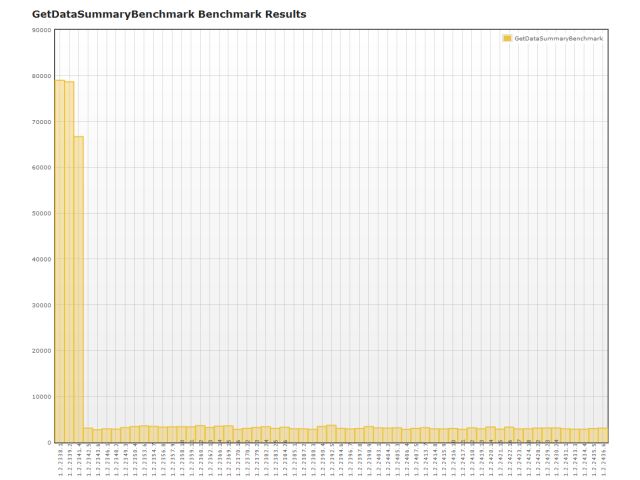
As functionality is added over time, performance can be slowly eroded, and the change can be so gradual that you won’t even notice, like a lobster in a pot that is heating up. By running benchmarks after each build you can gain some visibility of the performance of parts of your system over time. Benchy can also show more reliable results of efforts to tune performance. Being able to measure empirical results over time is very powerful.
What does it look like?
How does it work?
Benchy is a simple command line tool that is called after each build to run a few benchmarks.
Benchmarks are run sequentially in separate processes so that caches do not skew results.
The results are stored in files and graphed.
What do I need to do to get this going?
Benchy works in a similar manner to unit tests. Benchmark code is marked up with attributes.
- Create a new assembly and write some code that will exercise what you want to benchmark.
- Download and add a reference to Benchy.Framework.dll. By running Install-Package Benchy in NuGet.
- Mark up your benchmark methods.
- Run Benchy.exe in your build system.
- Set up the the results web site to see the graphs by importing Benchy.Result.zip into IIS.
Code
Benchy.Framework.dll contains four attributes.
BenchmarkFixture – Mark the classes in your benchmark assembly with this.
SetUp – Mark the method that needs to set up stuff before the benchmark begins. The time it takes to run the code in setup is not counted towards the benchmark time. Each benchmark method will run setup once in a new process.
Benchmark – The benchmark code that is run in a separate process.
TearDown – Any clean up code can be run in this method.
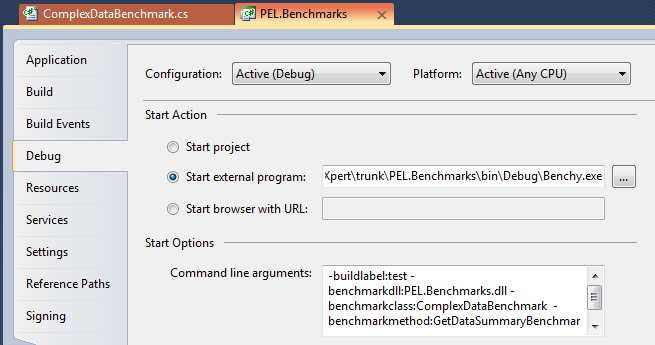
Running from Visual Studio
It can be handy to use Benchy to run benchmarks when optimising performance as it will do the timing and log results for you. It also runs each test in a separate process so caching does not artificially skew results.
Command Line Example
1-buildlabel:test -benchmarkdll:PEL.Benchmarks.dll -benchmarkclass:ComplexDataBenchmark -benchmarkmethod:GetDataSummaryBenchmark
Executing from the build system
The example below shows how to execute benchy from Cruise Control .net (ccnet):
1 2 3 4 5 6 7 8 9 10 11 12 13 14 15 16 17 18 19 20 21 22 23 24 25<conditional> <conditions> <statusCondition value="Success" /> <fileExistsCondition> <!-- only do benchmarking for branches that have it --> <file>$(projectdir)\Benchmarks\bin\Release\Benchy.exe</file> </fileExistsCondition> </conditions> <tasks> <exec> <executable>$(projectdir)\Benchmarks\bin\Release\Benchy.exe</executable> <baseDirectory>$(projectdir)\Benchmarks\bin\Release\</baseDirectory> <successExitCodes>0</successExitCodes> <buildTimeoutSeconds>1200</buildTimeoutSeconds> <dynamicValues> <replacementValue property="buildArgs"> <format>-buildlabel:{0} -benchmarkdll:$(projectdir)\Benchmarks\bin\Release\PEL.Benchmarks.dll -outputdirectory:C:\builds\Logs\benchmarks\$(projectname)</format> <parameters> <namedValue name="$CCNetLabel" value="1.0.0.0" /> </parameters> </replacementValue> </dynamicValues> </exec> </tasks> </conditional>
Getting good results
Best results are achieved when the benchmarks are run on a dedicated machine with no other applications hogging resources.
If the section of code you are testing is quick, writing benchmark code that executes what you want to test more than once can accentuate changes to performance.
Benchmark code should be minimal and changes should be avoided, otherwise it may look like performance has changed when it’s really a change to the benchmark.
Support
Go to https://github.com/kezakez/Benchy
I am no longer using this project, as build systems like Team City have this functionality built in.
License

Benchy by Keiran McDonald is licensed under a Creative Commons Attribution-ShareAlike 3.0 Unported License.

